Basic steps to implement the Ken Burns Effect with SlideShowPro 1.4.2 (and higher)
(For older versions of SlideShowPro, click here for instructions.)
By Scott Knaub
Web Management Services
scott@web-mgt.com
Last Revision: October 11, 2006
This tutorial is based on the following assumptions:
- you have Adobe Flash 8 (or greater) installed on your computer.
- you know how to create a slide show using the SlideShowPro component in Flash 8
- you know how to open the ActionScript panel in Flash 8
1. Download the Movieclip Tweening Prototype extension from here:
http://laco.wz.cz/tween/?page=download
Here is a screen shot of a section of the download page at the time this tutorial was written:
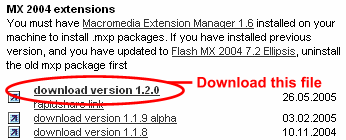
Unzip this file to a directory on your computer.
2. Open Extension Manager:

3. Install the Movieclip Tweening Prototype extension using Extension Manager:
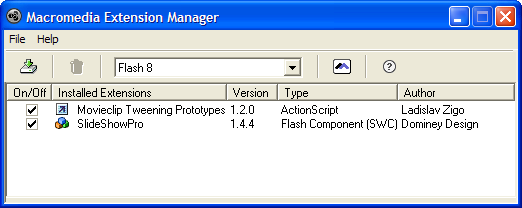
- Click "File" and then "Install Extension..."
- Navigate to where you saved the Movieclip Tweening Prototype extension
- Select the extension ".mxp" file
- Click the "Install" button
- Accept the license agreement (if any)
- Close Extension Manager
4. Open your slide show .fla file in Flash 8.
5. Set the Instance Name for your SlideShowPro component to "my_ssp".
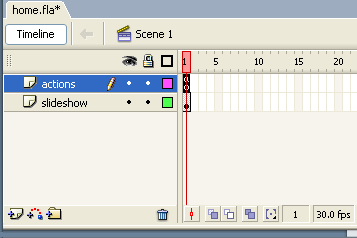
6. In the timeline, make a new layer above the layer that contains your SlideShowPro component
and name it "actions". Here's how my timeline looks:
7. Click on Frame 1 of your "actions" layer and paste the following code into the Actions panel for that frame:
// This script was found at: http://slideshowpro.net/forums/viewtopic.php?pid=15251
// The original author's site is: http://www.kingofpunk.com
#include "lmc_tween.as"
import flash.display.BitmapData;
// taille de la photo d'origine
ORIGINSCALE = 100;
// redimensionnement maximum
DESTINATIONSCALE = 110;
// Durée totale du tweening
TWEENDURATION = my_ssp.transitionPause + my_ssp.transitionLength * 2;
// durée du fade
FADEDURATION = my_ssp.transitionPause * 1000;
//
myListener = new Object ();
myListener.imageData = _imageData;
my_ssp.addEventListener ("imageData", myListener);
//
function _imageData (eventObject)
{
   if (my_ssp.displayMode == 'Auto')
   {
      kenBurnsEffect ();
   }
}
//
function kenBurnsEffect ()
{
   loader1 = _root.my_ssp.sspro_mc.imgs_mc.loader1_mc;
   loader2 = _root.my_ssp.sspro_mc.imgs_mc.loader2_mc;
   //
   if (my_ssp.thisLoader == loader1)
   {
      bitmapize (loader1);
      with (loader1)
      {
         _xscale = ORIGINSCALE;
         _yscale = ORIGINSCALE;
         tween (['_xscale', '_yscale'], [DESTINATIONSCALE, DESTINATIONSCALE], TWEENDURATION, 'linear');
      }
   }
   else if (my_ssp.thisLoader == loader2)
   {
      bitmapize (loader2);
      with (loader2)
      {
         _xscale = DESTINATIONSCALE;
         _yscale = DESTINATIONSCALE;
         tween (['_xscale', '_yscale'], [ORIGINSCALE, ORIGINSCALE], TWEENDURATION, 'linear');
      }
   }
}
//
//
function bitmapize (imgContainer)
{
   myBitmap.dispose ();
   myBitmap = new BitmapData (imgContainer._width, imgContainer._height, true, 0x00FFFFFF);
   myBitmap.draw (imgContainer);
   imgContainer.attachBitmap (myBitmap, 1, "auto", true);
}
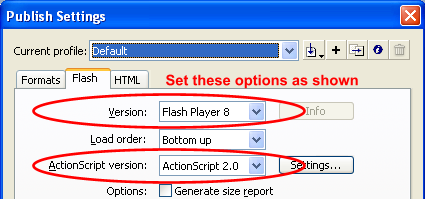
8. In Publish Settings, on the Flash tab make sure the options are set as shown:
9. Save your changes.
10. Publish your movie.
When you view the movie, you should now see the Ken Burns Effect.